Tuesday, 22 March 2016

ISIS Multitopology and single Topology

When working with IPv6 prefixes in IS-IS, you can configure IS-IS to be in a single topology for both IPv4 and IPv6 or to run different topologies for IPv4 and IPv6.

IPv6

When running both IPv4 and IPv6 at the same time, IS-IS can be run in single-topology or multi-topolgy mode. In single topology, all your IS-IS links need to have both v4 and v6 addresses as the SPF tree is run indenpently of prefix information. If the SPF tree is calculated to use a link without a v6 address, IPv6 traffic will be blackholed over that link.
For now I’ve added an IPv6 loopback and interface address. I’ve got IS-IS running in multi topology mode. I should still only see two LSPs from XR1’s perspective:
RP/0/0/CPU0:XR1#show isis database
Tue Aug 12 23:47:02.152 UTC

IS-IS 1 (Level-2) Link State Database
LSPID                 LSP Seq Num  LSP Checksum  LSP Holdtime  ATT/P/OL
XR1.00-00           * 0x0000001e   0x9683        1115            0/0/0
XR2.00-00             0x0000002b   0x62fa        1117            0/0/0

 Total Level-2 LSP count: 2     Local Level-2 LSP count: 1
IPv6 information is carried inside another TLV. Note also that there is a new NLPID value of 0x8e in the LSP. As you would guess this value represents IPv6:
RP/0/0/CPU0:XR1#show isis database detail XR2.00-00
Tue Aug 12 23:47:50.899 UTC

IS-IS 1 (Level-2) Link State Database
LSPID                 LSP Seq Num  LSP Checksum  LSP Holdtime  ATT/P/OL
XR2.00-00             0x0000002b   0x62fa        1068            0/0/0
  Area Address: 49.0023
  NLPID:        0xcc
  NLPID:        0x8e
  MT:           Standard (IPv4 Unicast)
  MT:           IPv6 Unicast                                     0/0/0
  Hostname:     XR2
  IP Address:   2.2.2.2
  IPv6 Address: 2001:db8:2:2::2
  Metric: 10         IS XR1.00
  Metric: 10         IP 2.2.2.2/32
  Metric: 20         IP 3.3.3.3/32
  Metric: 10         IP 10.0.12.0/24
  Metric: 10         IP 10.0.23.0/24
  Metric: 10         IP 200.200.200.200/32
  Metric: 10         MT (IPv6 Unicast) IS-Extended XR1.00
  Metric: 10         MT (IPv6 Unicast) IPv6 2001:db8:2:2::2/128
  Metric: 10         MT (IPv6 Unicast) IPv6 2001:db8:12::/64
When running multi-topology mode, you’ll see MT: plus the address families configured for multi-topology. If I change this to single topology:
RP/0/0/CPU0:XR1#show isis database XR2.00-00 detail
Tue Aug 12 23:11:20.989 UTC

IS-IS 1 (Level-2) Link State Database
LSPID                 LSP Seq Num  LSP Checksum  LSP Holdtime  ATT/P/OL
XR2.00-00             0x00000023   0xd22a        1196            0/0/0
  Area Address: 49.0023
  NLPID:        0xcc
  NLPID:        0x8e
  Hostname:     XR2
  IP Address:   2.2.2.2
  IPv6 Address: 2001:db8:2:2::2
  Metric: 10         IS XR1.00
  Metric: 10         IP 2.2.2.2/32
  Metric: 10         IP 10.0.12.0/24
  Metric: 10         IP 10.0.23.0/24
  Metric: 10         IP 200.200.200.200/32
  Metric: 10         IPv6 2001:db8:2:2::2/128
  Metric: 10         IPv6 2001:db8:12::/64
MT no longer shows up, and all TLVs are added as-is to the LSP.


First of all, let’s see how IS-IS works by default when activating IPv6. The lab I’m going to use is as follows:
By default, IS-IS works in single-topology mode when activating IPv4 and IPv6. This means that the IS-IS topology will be built based on IS Reachability TLVs. When the base topology is built, then IPv4 prefixes (IP Reachability TLV) and IPv6 prefixes (IPv6 Reachability TLV) are added to each node as leaves, without checking if there is IPv6 connectivity between nodes.
Let’s imagine we have the above IPv4 and IPv6 address scheme. As we can see, adjacencies are formed regardless the IP scheme on the link:
R4# show isis neighbors
System Id      Type Interface   IP Address      State Holdtime Circuit Id
R1             L1   Fa1/0       10.10.14.1      UP    24       R4.01
R1             L2   Fa1/0       10.10.14.1      UP    29       R4.01
R5             L1   Fa2/0       10.10.45.5      UP    9        R5.01
R5             L2   Fa2/0       10.10.45.5      UP    9        R5.01
R4# show isis ipv6 topology
R4#
R4# show isis topology
IS-IS TID 0 paths to level-1 routers
System Id            Metric     Next-Hop             Interface   SNPA
R1                   10         R1                   Fa1/0       ca00.0f26.0038
R2                   20         R1                   Fa1/0       ca00.0f26.0038
R4                   --
R5                   10         R5                   Fa2/0       ca04.0f5d.001c 

IS-IS TID 0 paths to level-2 routers
System Id            Metric     Next-Hop             Interface   SNPA
R1                   10         R1                   Fa1/0       ca00.0f26.0038
R2                   20         R1                   Fa1/0       ca00.0f26.0038
R4                   --
R5                   10         R5                   Fa2/0       ca04.0f5d.001c
R4#
R5# show isis neighbors
System Id      Type Interface   IP Address      State Holdtime Circuit Id
R4             L1   Fa1/0       10.10.45.4      UP    24       R5.01
R4             L2   Fa1/0       10.10.45.4      UP    28       R5.01
R5# show isis ipv6 topology
R5#
R5# show isis topology
IS-IS TID 0 paths to level-1 routers
System Id            Metric     Next-Hop             Interface   SNPA
R1                   20         R4                   Fa1/0       ca03.0f3b.0038
R2                   30         R4                   Fa1/0       ca03.0f3b.0038
R4                   10         R4                   Fa1/0       ca03.0f3b.0038
R5                   --

IS-IS TID 0 paths to level-2 routers
System Id            Metric     Next-Hop             Interface   SNPA
R1                   20         R4                   Fa1/0       ca03.0f3b.0038
R2                   30         R4                   Fa1/0       ca03.0f3b.0038
R4                   10         R4                   Fa1/0       ca03.0f3b.0038
R5                   --
R5#
As we can see, the IS-IS IPv4 topology is built (IS Reachability TLV), and IPv4 and IPv6 prefixes are added to each node based on the information announced by each router (IP Reachability TLV and IPv6 Reachability TLV). IS-IS doesn’t check the IPv6 consistency in the actual topology, so we may come to the scenario where R5 thinks there is IPv6 connectivity to reach R1 IPv6 address, when indeed, there isn’t:
R5# sh ipv6 route
....
I1  2001:CC1E:1:1::1/128 [115/20]
     via FE80::C803:FFF:FE3B:38, FastEthernet1/0
I1  2001:CC1E:2:2::2/128 [115/30]
     via FE80::C803:FFF:FE3B:38, FastEthernet1/0
I1  2001:CC1E:4:4::4/128 [115/10]
     via FE80::C803:FFF:FE3B:38, FastEthernet1/0
LC  2001:CC1E:5:5::5/128 [0/0]
     via Loopback0, receive
...
R5# ping ipv6 2001:CC1E:1:1::1
Type escape sequence to abort.
Sending 5, 100-byte ICMP Echos to 2001:CC1E:1:1::1, timeout is 2 seconds:
.....
Success rate is 0 percent (0/5)
R5#
R5# ping ipv6 2001:cc1e:4:4::4
Type escape sequence to abort.
Sending 5, 100-byte ICMP Echos to 2001:CC1E:4:4::4, timeout is 2 seconds:
!!!!!
Success rate is 100 percent (5/5), round-trip min/avg/max = 8/16/32 ms
What can we do to avoid this behaviour? We can activate IS-IS Multitopology. Doing so, IS-IS creates two different topologies: one built based on IS Reachability TLVs and dedicated to IPv4 routing info, and a second one built based on Multitopology IS Reachability TLVs and dedicated to IPv6 routing info.
(in each router)
router isis
 net 49.0001.0050.0500.5005.00
 metric-style wide
 passive-interface Loopback0
 !
 address-family ipv6
  multi-topology
 exit-address-family
R5# show isis topology
IS-IS TID 0 paths to level-1 routers
System Id            Metric     Next-Hop             Interface   SNPA
R1                   20         R4                   Fa1/0       ca03.0f3b.0038
R2                   30         R4                   Fa1/0       ca03.0f3b.0038
R4                   10         R4                   Fa1/0       ca03.0f3b.0038
R5                   --

IS-IS TID 0 paths to level-2 routers
System Id            Metric     Next-Hop             Interface   SNPA
R1                   20         R4                   Fa1/0       ca03.0f3b.0038
R2                   30         R4                   Fa1/0       ca03.0f3b.0038
R4                   10         R4                   Fa1/0       ca03.0f3b.0038
R5                   --

R5# show isis ipv6 topology
IS-IS TID 2 paths to level-1 routers
System Id            Metric     Next-Hop             Interface   SNPA
R1                   **
R2                   **
R4                   10         R4                   Fa1/0       ca03.0f3b.0038
R5                   --

IS-IS TID 2 paths to level-2 routers
System Id            Metric     Next-Hop             Interface   SNPA
R1                   **
R2                   **
R4                   10         R4                   Fa1/0       ca03.0f3b.0038
R5                   --
Having two different topologies, now IS-IS can add IPv4 prefixes and IPv6 prefixes to the correspondent node depending on the topology. Because in the IPv6 topology there is no connectivity between R1 and R4, the IPv6 info is consistent, and we can see that R4 and R5 doesn’t see R1 and R2 IPv6 prefixes as reachable:
R5# show ipv6 route
...
I1  2001:CC1E:4:4::4/128 [115/10]
     via FE80::C803:FFF:FE3B:38, FastEthernet1/0
LC  2001:CC1E:5:5::5/128 [0/0]
     via Loopback0, receive
...
R5# ping 2001:cc1e:4:4::4 sour lo0
Packet sent with a source address of 2001:CC1E:5:5::5
!!!!!
Success rate is 100 percent (5/5), round-trip min/avg/max = 4/10/20 ms
Of course, having two topologies increases the resources needed by each router, and also the runs twice the spf algorithm, since you need to keep two topology bases.
So all these make me think that a single-topology architecture is thought for dual-stack networks, where there is IPv4 and IPv6 connectivity end to end. While multitopology is for those scenarios where there may be some segments where IPv6 connectivity is not granted.

BGP additional path

Configuring BGP Additional Paths

We will describes how to configure additional paths for the Border Gateway Protocol (BGP).
This chapter includes the following sections:

Information About BGP Additional Paths

This section includes the following topics:

Overview

BGP routers and route reflectors (RRs) propagate only their best paths over their sessions. The advertisement of a prefix replaces the previous announcement of that prefix (this behavior is known as an implicit withdraw). The implicit withdraw can achieve better scaling, but at the cost of path diversity.
Path hiding can prevent efficient use of BGP multipath, prevent hitless planned maintenance, and lead to multi-exit discriminator (MED) oscillations and suboptimal hot-potato routing. In a next-hop failure, path hiding inhibits fast and local recovery because the network has to wait for BGP control plane convergence to restore traffic. The BGP Additional Paths feature offers path diversity; the best external or best internal features offer path diversity in limited scenarios.
The BGP Additional Paths feature allows multiple paths for the same prefix to be advertised without the new paths implicitly replacing the previous paths. Path diversity is achieved instead of path hiding.

Path-Hiding Scenario

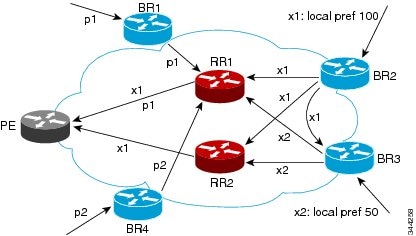
The following figure shows prefix p with paths p1 and p2 advertised from BR1 and BR4 to RR1. RR1 selects the bes tpath of the two and then advertises only p1 to the PE.
Figure 9-1 RR Hiding an Additional Path
In the above figure, prefix x with path x1 is advertised from BR2 to BR3 (which has path x2) with local preference 100. BR3 also has path x2, but due to the routing policy, BR3 advertises to the RRs x1 (not shown) instead of x2, x2 is suppressed. You could turn on the advertisement of best external on BR3 and advertise x2 to the route reflectors (RRs), but, the RRs advertise only the best path.

Suboptimal Hot-Potato Routing Scenario

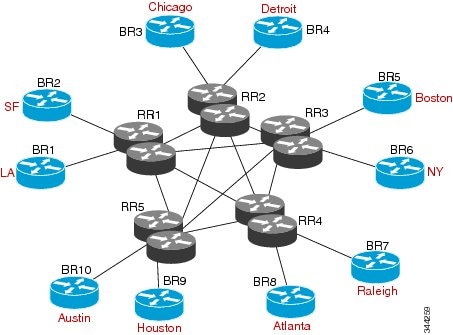
To minimize internal transport costs, transit Internet service providers try to forward packets to the closest exit point (according to the Interior Gateway Protocol (IGP) cost). This behavior is known as hot-potato routing. In the distributed RR cluster model of the figure below, assume traffic that is coming from LA must go to Mexico. All links have the same IGP cost. If there are two exit points toward Mexico—one toward Austin and one toward Atlanta—the border router will try to send traffic to Austin based on the lower IGP cost from LA toward Austin than toward Atlanta. In a centralized RR model where the central RR resides where RR3 is (and RR1, RR2, RR4, and RR5 do not exist), the closest exit point toward Mexico, as seen from RR3, might be Atlanta. Sending the traffic from LA toward the Atlanta border router (BR) results in suboptimal hot-potato routing and is not desirable.
Figure 9-2 Distributed RR Cluster
 

Benefits of Additional BGP Paths

BGP routers and route reflectors (RR) propagate only their best path over their sessions. The advertisement of a prefix replaces the previous announcement of that prefix (also known as an implicit withdraw).
While this behavior might achieve better scaling, it can prevent path diversity, which tends to be poor or completely lost. This behavior prevents efficient use of the BGP multipath, prevents hitless planned maintenance, and lead to multi-exit discriminator (MED) oscillations and suboptimal hot-potato routing. It also inhibits fast and local recovery for next-hop failures, because the network has to wait for BGP control plane convergence to restore traffic.
The BGP Additional Paths feature is a BGP extension that allows the advertisement of multiple paths for the same prefix without the new paths implicitly replacing any previous paths. This behavior promotes path diversity and reduces MED oscillations.

BGP Additional Paths Functionality

You can use the BGP Additional Paths feature by adding a path identifier to each path in the Network Layer Reachability Information (NLRI). The path identifier (ID) can be considered as something similar to a route distinguisher (RD) in virtual private networks (VPNs), except that a path ID can apply to any address family. Path IDs are unique to a peering session and are generated for each network. The path identifier is used to prevent a route announcement from implicitly withdrawing the previous one. The Additional Paths feature allows the advertisement of more paths, in addition to the best path and allows the advertisement of multiple paths for the same prefix, without the new paths implicitly replacing any previous paths.
The BGP Additional Paths feature requires you to take general steps:
1. Specify whether the device can send, receive, or send and receive additional paths at the address family level or the neighbor level. During session establishment, two BGP neighbors negotiate the additional path capabilities (whether they can send or receive) between them.
2. Select a set or sets of candidate paths for advertisement by specifying the selection criteria.
3. Advertise for a neighbor a set or sets of additional paths from the candidate paths marked.
To send or receive additional paths, the additional path capability must be negotiated between the neighbors. If no negotiation occurs, even if the selection criteria marks the best path and the neighbor is configured to advertise the marked paths, the selections are useless because only the best path is advertised.
Configuring BGP to send or receive additional paths triggers negotiation of an additional path’s capability with the device's peers. Neighbors that have negotiated the capability are grouped together in an update group (if other update group policies allow), and in a separate update group from those peers that have not negotiated the capability. Therefore, the additional path capability causes the neighbor's update group membership to be recalculated.

Additional Path Selection

Only the best path is advertised to peers unless you configure the set path-selection all advertise command which advertises all BGP paths as additional paths to peers if the receive capability is enabled.

Advertising a Subset of the Paths Selected

Take care when you select a set of paths but want to advertise a different set of paths. If the set of paths you want to advertise is not a subset of the selected paths, you will not advertise the paths that you want advertised.

Guidelines and Limitations

Configuring BGP Additional Paths has the following guidelines and limitations:
  • BGP add-path is not supported as a dynamic capability. It is included in the OPEN message, but not in CAPABILITY message. The configuration takes effect when the next session is established and does not cause established sessions to get torn down.

Configuring BGP Additional Paths

This section includes the following topics:

Configuring BGP Additional Paths for each Address Family

You can specify whether the device can send and receive additional paths to and from all neighbors within an address family.

BEFORE YOU BEGIN

Ensure that you have enabled the BGP feature.

SUMMARY STEPS

1. configure terminal
2. router bgp as-number
3. address family {ipv4 | ipv6} unicast
4. additional-paths receive
5. additional-paths send
6. additional-paths selection route-map map-name
7. end

DETAILED STEPS


Command
Purpose
Step 1
configure terminal
 
Example :
switch# configure terminal
switch(config)#
Enters global configuration mode.
Step 2
router bgp as-number
 
Example :
switch(config)# router bgp 65000
switch(config-router)#
Enables BGP and assigns the autonomous system number to the local BGP speaker.
Step 3
address family {ipv4 | ipv6} unicast
 
Example :
switch(config-router)# address family ipv6 unicast
Enters address family configuration mode.
Step 4
additional-paths receive
 
Example :
switch(config-router-af)# additional-paths receive
(Optional) Enables BGP additional paths for a prefix to be received from a capable peer.

Note This capability applies to all neighbors under the specified address family unless the capability is explicitly disabled with the neighbor additional-paths receive disable command, which overrides the configuration for the address family.

Step 5
additional-paths send
 
Example :
switch(config-router-af)# additional-paths send
(Optional) Enables BGP additional paths for a prefix to be sent to a capable peer.

Note This capability applies to all neighbors under the specified address family unless the capability is explicitly disabled with the neighbor additional-paths send disable command, which overrides the configuration for the address family.

Step 6
additional-paths selection route-map map-name
 
Example :
switch(config-router-af) # additional-paths selection route-map rmap
(Optional) Configures additional paths selection capability for a prefix.
Step 7
end
 
Example:
switch(config-router-af)# end
(Optional) Exits to privileged EXEC mode.

Configuring BGP Additional Paths for each Neighbor

You can configure whether a particular neighbor can send or receive additional paths.

BEFORE YOU BEGIN

Ensure that you have enabled the BGP feature (see the “Enabling the BGP Feature” section).

SUMMARY STEPS

1. configure terminal
2. router bgp as-number
3. neighbor { ipv4-address | ipv4-prefix/length | ipv6-address | ipv6-prefix/length } [ remote-as { as-num } [. as-num ]]
4. address family {ipv4 | ipv6} unicast
5. capability additional-paths receive [disable]
6. capability additional-paths send [disable]
7. end

DETAILED STEPS


Command
Purpose
Step 1
configure terminal
 
Example :
switch# configure terminal
switch(config)#
Enters global configuration mode.
Step 2
router bgp as-number
 
Example :
switch(config)# router bgp 65000
switch(config-router)#
Enables BGP and assigns the autonomous system number to the local BGP speaker.
Step 3
neighbor {ipv4-address | ipv4-prefix/length | ipv6-address
| ipv6-prefix/length} [ remote-as {as-num} [.as-num ]]
 
Example :
switch(config-router)# neighbor 2001:DB8::1037
Configures a BGP neighbor (router, VRF) and enters neighbor configuration mode.
Step 4
address family {ipv4 | ipv6} unicast
 
Example :
switch(config-router)# address family ipv6 unicast
Enters address family configuration mode.
Step 5
capability additional-paths receive [disable]
 
Example :
switch(config-router-af)# capability additional-paths receive
(Optional) Configures the receive additional paths capability for the specified neighbor.

Note This command overrides any send or receive capability that is configured at the address-family level.

Step 6
capability additional-paths send [disable]
 
Example :
switch(config-router-af)# capability additional-paths send
(Optional) Configures the send additional paths capability for the specified neighbor.

Note This command overrides any send or receive capability that is configured at the address-family level.

Step 7
end
 
Example:
switch(config-router-af)# end
(Optional) Exits to privileged EXEC mode.

Configuring Additional Paths Using a Peer Policy Template

You can send and receive additional paths by using a peer policy template.

BEFORE YOU BEGIN

Ensure that you have enabled the BGP feature (see the “Enabling the BGP Feature” section).

SUMMARY STEPS

1. configure terminal
2. router bgp as-number
3. template peer-policy template-name
4. capability additional-paths receive [disable]
5. capability additional-paths send [disable]
6. exit
7. neighbor { ipv4-address | ipv4-prefix/length | ipv6-address | ipv6-prefix/length } [ remote-as { as-num } [. as-num ]]
8. inherit peer-policy template-name sequence-number
9. end

DETAILED STEPS


Command
Purpose
Step 1
configure terminal
 
Example :
switch# configure terminal
switch(config)#
Enters global configuration mode.
Step 2
router bgp as-number
 
Example :
switch(config)# router bgp 65000
Enters BGP mode and assigns the autonomous system number to the local BGP speaker.
Step 3
template peer-policy template-name
 
Example :
switch(config-router)# template peer-policy rr-client-ptl #
Enters policy-template configuration mode and creates a peer policy template.
Step 4
capability additional-paths receive [disable]
 
Example :
switch(config-router-af)# capability additional-paths receive
(Optional) Configures the receive additional paths capability for the specified neighbor.

Note This command overrides any send or receive capability that is configured at the address-family level.

Step 5
capability additional-paths send [disable]
 
Example :
switch(config-router-af)# capability additional-paths send
(Optional) Configures the send additional paths capability for the specified neighbor.

Note This command overrides any send or receive capability that is configured at the address-family level.

Step 6
exit
 
Example :
switch(config-router-ptmp)# exit
 
Exits policy-template configuration mode and returns to router configuration mode.
Step 7
neighbor {ipv4-address | ipv4-prefix/length | ipv6-address
| ipv6-prefix/length} [ remote-as {as-num} [.as-num]]
 
Example :
switch(config-router)# neighbor 2001:DB8::1037
Configures a BGP neighbor (router, VRF) and enters neighbor configuration mode.
Step 8
address-family ipv4 unicast
 
Example :
switch(config-router-neighbor)# address-family ipv4 unicast
switch(config-router-neighbor-af)#
(Optional) Configures global address family configuration mode for the specified address family.
Step 9
inherit peer-policy template-name sequence-number
 
Example :
switch(config-router-neighbor-af)# inherit peer-policy rr-client-ptl 10
Sends a peer policy template to a neighbor so that the neighbor can inherit the configuration.
Step 10
end
 
Example:
switch(config-router-af)# end
(Optional) Exits to privileged EXEC mode.

Filtering and Setting Actions for Additional Paths

You can optionally use a route map to filter the paths to be advertised by matching on the prefix of additional paths that are candidates to be advertised. (These prefixes are configured with the additional-paths selection command.)
You can also optionally set one or more actions to take for those paths that pass through the route map. This procedure uses the set metric command. Other set commands are available that are not shown in this task.
You would set a metric for paths marked with all (all paths with a unique next-hop) if the neighbor is receiving the same routes from its neighbors. Suppose the neighbor 2001:DB8::1037 is receiving the same route from different neighbors. Routes received from the local device have a metric of 565 and routes from another device have a metric of 700. Routes with metric 565 have precedence over the routes with metric 700.

SUMMARY STEPS

1. configure terminal
2. route-map route-name [ deny | permit ] [ sequence-number ]
3. set path-selection all advertise
4. set metric metric-value
5. end

DETAILED STEPS

:
Command
Purpose
Step 1
configure terminal
 
Example :
switch# configure terminal
switch(config)#
Enters global configuration mode.
Step 2
route-map map-name [ deny | permit ] [ sequence-number ]
 
Example :
switch(config)# route-map add_path4 permit 10
Defines a route map and the conditions for redistributing routes from one routing protocol into another.
Step 3
set path-selection all advertise
 
Example :
switch(config-route-map)# set path-selection all advertise
Advertises all BGP paths as additional paths to peers if the receive capability is enabled.
Step 4
set metric metric-value
 
Example :
switch(config-route-map)# set metric 500
Sets the metric of the additional paths that pass the match criteria.
  • Other set commands can be used to take action on the paths that pass the route map.
Step 5
end
 
Example:
switch(config-router-af)# end
(Optional) Exits to privileged EXEC mode.

Configuration Examples for BGP Additional Paths

This section includes the following topics:

BGP Additional Paths Send and Receive Capabilities

R1

In this example, R1's address is 2001:db8::1045; its neighbor R2 has an address of 2001:db8::1037. Updates are sent from R2 to R1 with additional-paths (all paths advertised). Updates are sent from R1 to R2 with only the classic BGP best path advertised because R2 can only send additional paths, not receive additional paths.
route-map add_path4 permit 10
set metric 500
set path-selection all advertise
!!
router bgp 1
address-family ipv6 unicast
additional-paths send
additional-paths receive
additional-paths selection route-map add_path4
neighbor 2001:db8::1037
address-family ipv6 unicast
capability additional-paths send
capability additional-paths receive

R2

route-map add_path4 permit 10
set metric 500
set path-selection all advertise
!!
router bgp 2
address-family ipv6 unicast
additional-paths selection route-map add_path4
neighbor 2001:db8::1045
address-family ipv6 unicast
capability additional-paths send

BGP Additional Paths Using a Peer Policy Template

This example shows that the neighbor with IP address 2001:db8::1037 has the send and receive capability for additional paths enabled through the template named rr-client-pt1:
router bgp 65000
address-family ipv6 unicast
additional-paths send
additional-paths receive
additional-paths selection route-map add_path4
neighbor 2001:db8::1037
address-family ipv6 unicast
inherit peer-policy rr-client-pt1 10
template peer-policy rr-client-pt1
capability additional-paths send
capability additional-paths receive

Verifying the BGP Additional Paths Configuration

To display information about the BGP additional paths configuration, perform the following tasks:
 
Command
Purpose
show ip bgp [ip-address]
Displays entries in the BGP table.
show ip bgp neighbors [ip-address [ advertise-routes ]]
Displays the configured neighbors and the other information specific to individual neighbor.